Colours, Cabbages and Cobblestones in Rome

Colours, Cabbages and Cobblestones in Rome - photography by www.paolathomas.com

This year we decided to start our family vacation in Rome, and I went back for the first time since working there for six months way back when.

I had lived in an apartment in Campo de’ Fiori in the heart of the medieval Centro Storico, which I adored, and this time we decided to rent a really cute Air BnB apartment in the same neighbourhood. One of the things I love most about Campo de’ Fiori is the magnificent market which fills the piazza every morning and is a paradise for food and street photography. It was great just to hang out in the mornings watching the stallholders and restaurant owners set up, before the serious sightseeing of the day began.

Colours, Cabbages and Cobblestones in Rome - photography by www.paolathomas.com

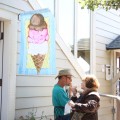
Come for a little walk with me through the twisty streets of Rome and the market of Campo de’ Fiori.

Colours, Cabbages and Cobblestones in Rome - photography by www.paolathomas.com

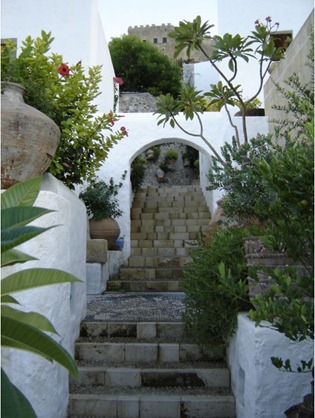
Our apartment was in this little cobbled street between Campo de’ Fiori and Piazza Farnese.

Colours, Cabbages and Cobblestones in Rome - photography by www.paolathomas.com

Fountain in Piazza Farnese

Colours, Cabbages and Cobblestones in Rome - photography by www.paolathomas.com

We breakfasted every morning in the Caffe Farnese, five minutes from our apartment. Here is the Minx writing her vacation journal (she became markedly less diligent the further we got into our holiday).

Colours, Cabbages and Cobblestones in Rome - photography by www.paolathomas.com

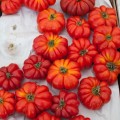
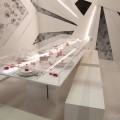
The market was a delight.

Colours, Cabbages and Cobblestones in Rome - photography by www.paolathomas.com

Colours, Cabbages and Cobblestones in Rome - photography by www.paolathomas.com

Colours, Cabbages and Cobblestones in Rome - photography by www.paolathomas.com Colours, Cabbages and Cobblestones in Rome - photography by www.paolathomas.com

Colours, Cabbages and Cobblestones in Rome - photography by www.paolathomas.com

Colours, Cabbages and Cobblestones in Rome - photography by www.paolathomas.com Colours, Cabbages and Cobblestones in Rome - photography by www.paolathomas.com

Colours, Cabbages and Cobblestones in Rome - photography by www.paolathomas.com

Colours, Cabbages and Cobblestones in Rome - photography by www.paolathomas.com

Colours, Cabbages and Cobblestones in Rome - photography by www.paolathomas.com

Colours, Cabbages and Cobblestones in Rome - photography by www.paolathomas.com

Campo de’ Fiori means ‘field of flowers’ and that still rings true today.

Colours, Cabbages and Cobblestones in Rome - photography by www.paolathomas.com

Colours, Cabbages and Cobblestones in Rome - photography by www.paolathomas.com

Colours, Cabbages and Cobblestones in Rome - photography by www.paolathomas.com

Rome was gripped by World Cup fever when we arrived, which lasted only until Italy’s ignominious defeat at the hands, or more accurately teeth, of Uruguay, which we watched in one of the open air restaurants in the piazza.

Colours, Cabbages and Cobblestones in Rome - photography by www.paolathomas.com

Even my old friend, the statue of Giordano Bruno, which gazes out over the piazza at the site where he was burned to death, was subdued that evening.

Colours, Cabbages and Cobblestones in Rome - photography by www.paolathomas.com

Unfortunately I made a terrible parenting mistake by buying Mission Rome for the Minx. It’s a sightseeing scavenger hunt book which I thought would keep the Minx vaguely amused if we took in a few sights.

Instead I refer to the review of the book I wrote on Amazon. My love/hate relationship with this book runs very deep.

Do not on any account by this book! *****

If you want to have a pleasant, relaxing, wine-fuelled Roman interlude that is… I bought this for my nine-year old daughter and then spent 3 days being marched all over Rome while she figured out every possible permutation of itinerary and points scores (also tremendously good for her math). Half of me was thrilled she was so inspired and half of me wanted to take the book to the very heart of the Colosseum (4 points), stab it, burn it and gouge its eyes out .

This book is like sightseeing crack, perfectly pitched at 3rd to 6th graders, and has pulled together some really interesting facts and cool things to locate, which kept the interest not just of my grade schooler but also of her exhausted parents. Thank goodness we only had three days to spend in Rome and very good walking shoes. Seriously you buy this book at your peril. Caveat emptor.

Colours, Cabbages and Cobblestones in Rome - photography by www.paolathomas.com Colours, Cabbages and Cobblestones in Rome - photography by www.paolathomas.com

Here’s the Minx scribbling in the accursed book and here’s the Husband just after telling some heinous lie to the Bocca della Verita.

Colours, Cabbages and Cobblestones in Rome - photography by www.paolathomas.com

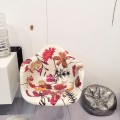
I think we stopped to talk to pretty much every cat in Rome.

Colours, Cabbages and Cobblestones in Rome - photography by www.paolathomas.com

And, as has been the case since time immemorial, the cobbled streets of the Eternal City were filled with gladiators and nuns.

Colours, Cabbages and Cobblestones in Rome - photography by www.paolathomas.com

It was lovely to be back.

Share

Weekend Link Love

InstagramAug3

Oh it’s been SO long since I did one of these.

The weather continues to be absolutely glorious in Seattle but we haven’t quite been making the most of it as both the Husband and the Minx have been down with gastric flu, while I’m just sitting here waiting to get it. Before that though it was a week of sunshine-y walks, beautiful sunsets, watermelon cocktails, paddleboarding (I’ve been taking lessons! I love it!), and delicious vegetables.

I’ve also been enjoying this lovely wire ‘bonjour’ from Anthropologie which I’ve hung in my bedroom on the wall next to my bed. It’s a bit pricey for a little thing, but it delights me every time I get up, so for me it’s worth it.  And I’ve been bowled over by my fabulous new Whitney English Day Designer planner August 2014 edition, which I’m sort of in love with. I feel like my life is going to be utterly and perfectly organised going forward, which is not too much to ask of a planner is it? (New January planners come out on August 15th and I’ll be writing a fuller review of mine before then so you can be perfectly organised too).

Here are some things I’ve noticed in my travels around the web this week.

Lakshmi at PureVege does the sort of food photography that makes my heart twist in envy and awe. Utter perfection.

As you know I’ve been doing a lot of travelling recently. Some of these fabulous travel tips could have come in very useful over the past few months.

My friend Melanie Biehle found these simple, graphic posters of cakes by UK branding agency Purpose. They make me want to make a Battenberg cake immediately (it was one of my favourite cakes as a child, and I miss them here in the US).

British author Zadie Smith gives us 10 truthful rules of writing.

Obviously I truly and desperately need a personalised rolling pin (don’t we all?)

And I am so, so, so, so, so, so, SO tempted to download the Kim Kardashian game that everyone is talking about. Have any of you tried it? How quickly will it rot my brain?

On the blog over the last week or so, I posted some more pics of Tuscany and a tribute to the chef I met there and a recipe for Mixed Fruit Clafoutis. Will try to up the bloggery over the next week or so.

How are you all enjoying your summers?

Sunset - Photography by www.paolathomas.com

(The sun did this last night, just before sunset. I’ve never seen anything quite like it).

Share

Tuscan Landscapes And A Small Goodbye

Tuscan Landscapes - Photography by www.paolathomas.com

Tuscan Landscapes - Photography by www.paolathomas.com

I  was going to move on from Tuscany with my posts this week, but my thoughts have been returning there in recent days after I received some truly awful news. Chef Enrico Casini, who brought such vivacity and personality, as well as seriously good food, to Le Casacce – the Tuscan agriturismo where the Plated Stories workshop was held – died quietly in his sleep at the weekend.

Tuscan Landscapes - Photography by www.paolathomas.com

Tuscan Landscapes - Photography by www.paolathomas.com

He was far too young – only sixty-two – but apparently he went with a smile on his lips, after a busy night in his restaurant, in his own little corner of paradise.

Tuscan Landscapes - Photography by www.paolathomas.com

I didn’t know him well of course, but he was a man of such obvious passion and heart, such energy and kindness, such a love for his craft and the ingredients that inspired it  –  that I know he will be sorely missed as a father, friend, employer and chef. 

Tuscan Landscapes - Photography by www.paolathomas.com

Every morning he would be bustling around the property, always wearing a pair of colourful glasses, and dashing in and out of his kitchen. Every afternoon he would,if he could, sit quietly in his lounger, reading the paper and gazing on the landscape for an hour or so. And every evening he would stand in his busy, laughter-filled dining room, more often than not with Barry White playing in the background, and describe the exquisite meal he’d just created in his broken English, invariably using produce ‘from this land’ and liberally garnished with ‘my olive oil’.

Tuscan Landscapes - Photography by www.paolathomas.com

We would wait for those words, spoken in his inimitable way, and laugh when he got to the punchline, but underneath they spoke of a deeper truth – his abiding love of the land, of the ingredients that sprang from it and the food it inspired.

Tuscan Landscapes - Photography by www.paolathomas.com

According to his obituaries, Enrico, through his many restaurants, his cooking and his food writing, was at the vanguard of the revival in cucina italiana in the 60s and 70s, focusing on traditional Roman and Tuscan recipes, using local ingredients. I feel honoured and privileged to have been able to cook with him, albeit briefly, and came away with a sheaf of notes, that I hope soon to be able convert into recipes as a proper tribute to him.

Tuscan Landscapes - Photography by www.paolathomas.com

In the meantime, here are some photos of the landscape which so inspired him and informed and infused his cooking, all taken either within a few miles of Le Casacce or from the grounds of the property itself. I don’t usually feel moved to take landscapes – photos generally can never do them justice – but the land here was so beautiful I had to try (and bear in mind these photos don’t do the real landscapes justice either).

Tuscan Landscapes - Photography by www.paolathomas.com

Caro Enrico, may you rest in peace, I am grateful to have met you, to have experienced the warmth and generosity of your hospitality and to have come away with some of your recipes. I so much wanted to return to Le Casacce but now it will never be the same. I will also never again be able to hear Barry White without thinking of you. Ciao, ciao.

Tuscan Landscapes - Photography by www.paolathomas.com

Tuscan Landscapes - Photography by www.paolathomas.com

Tuscan Landscapes - Photography by www.paolathomas.com

Tuscan Landscapes - Photography by www.paolathomas.com

Linda Bass of Tuscan Muse, which she ran in partnership with Enrico, is heartbroken, but soldiering on, and has confirmed that the workshops will be continuing at Le Casacce as Enrico would have wanted and as part of his legacy.

Share

Mixed Fruit Clafoutis

Mixed Fruit Clafoutis - photography by www.paolathomas.com

Many, many eons ago, while I was studying French at university, I spent a year working as an English assistant in a couple of schools in the South West of France. Aside from this being one of the most enjoyable and formative years of my life, it was also remarkable from a culinary perspective. The other teachers were incredibly kind (mindful I think of their own time spent as French assistants in England) and would invite me often to their houses, and I also ended up giving lots of private English lessons, of the ‘chat in English to little Jean-Pierre for an hour, then join us for a dip in the pool and supper’ variety.

It was a lovely life, and also meant that I ended up dining in French people’s houses once or twice a week. Which was eye-opening. You learn a lot by seeing what people eat for reals – not in a restaurant or in a cooking class and when they’re not particularly trying to impress.

And I learned that in the South West of France, in summer, people eat a heck of a lot of clafoutis. Mostly made with cherries, but occasionally with the other stone fruits and berries of summer. And not surprisingly, because clafoutis is both super delicious and very easy to make.

If you search for ‘clafoutis’ on this blog you’ll see that it’s something I make a lot in the summer, and in fact I’ve posted the recipe before. But I made some beautiful mini mixed fruit ones last summer and never posted the pictures, so I hope you’ll forgive me if I post the recipe again, with some adaptations for minis.

Mixed Fruit Clafoutis - photography by www.paolathomas.com

First up get yourself a quantity of the most beautiful fruit you can find – cherries, apricots, currants, peaches and plums all work well. I used a mix of red and yellow cherries, apricots and redcurrants. The exact amount is a bit difficult to specify but should be enough to cover the bottom of the dishes you will be using. Clafoutis can be made in any shallow ovenproof dish. This recipe makes enough for the large dish shown here or for approximately 6 largeish ramekins.

Mixed Fruit Clafoutis - photography by www.paolathomas.com


Mixed Fruit Clafoutis
Serves 6
Mini mixed fruit version of the traditional French clafoutis
Write a review
Print
Prep Time
30 min
Prep Time
30 min
Ingredients
  1. Enough fruit to cover the bottom of your dish(es) in a single layer
  2. Enough butter to thoroughly grease your dish(es)
  3. 5 tablespoons all-purpose/plain flour
  4. 1/2 teaspoon salt
  5. 4 tablespoons granulated sugar
  6. 5 large eggs
  7. 2 cups/500ml/16 fl oz single cream or half and half or creamy milk or a mixture of milk and heavy/double cream, depending on how decadent/slim/rich you’re feeling
  8. 1 1/2 teaspoons vanilla extract
  9. 2 tablespoons dark rum, kirsch, Armagnac or maraschino (optional)
  10. Enough granulated or powdered sugar to dredge thickly when cooked
Instructions
  1. Preheat the oven to 350 degrees F/180degrees C/Gas Mark 4
  2. Remove stems and pit fruit if necessary. The French often leave the pits in cherries as they're said to add an additional almond flavour to the batter (but warn your guests!) If using apricots or larger fruits slice them in half.
  3. Slather your dish with butter and add the fruit in a single layer
  4. In a mixing bowl combine the dry ingredients
  5. Warm the milk or cream until barely simmering (be vigilant, it mustn't boil)
  6. Whisk the eggs into the warm cream
  7. Whisk the liquid ingredients into the dry ingredients until well-blended
  8. Stir in the the vanilla and rum etc. if using.
  9. Strain the batter over the fruit (very often I can’t be bothered to strain it) to a depth of about 1 1/2 inches. You should still be able to see the top of the fruit over the batter.
  10. Bake for 25 minutes for small clafoutis, 40 minutes for large until golden round the edges and firm to the touch
mirror mirror http://mirrormirrorblog.com/site/
Mixed Fruit Clafoutis - photography by www.paolathomas.com

Here are my little clafoutis showing the depth and proportion of batter to fruit you should be aiming for. Clafoutis is very forgiving, so make them in any shapes and sizes of cookware you have to hand until you have used up all your batter. 

Mixed Fruit Clafoutis - photography by www.paolathomas.com

 Here are my lovelies puffing up and firming up in the oven. 

And here they are all ready to eat. Serve with some chilled cream or creme fraiche if you’re feeling luxurious but it’s really not at all necessary. 

Mixed Fruit Clafoutis - photography by www.paolathomas.com

Dear hearts I am back!

If you haven’t been following along on Instagram (Sheesh, Paola, we have LIVES), we’ve just been on a family vacation to Rome, Sardinia, Corsica and an afternoon in England. And it was lovely. Though at the same time I am glad to be back sleeping in my very own bed for a bit and able to enjoy the rollicking Seattle summer.

I do of course have many, MANY photos to share with you, together with more from Tuscany (you didn’t think you’d be getting off THAT lightly did you?). You have been warned.

Share

Antica Tenuta Le Casacce


Jamie and Ilva found the most stunning location for our Tuscan adventure.

Antica Tenuta Le Casacce - photography by www.paolathomas.com

The Antica Tenuta Le Casacce is an agriturismo owned by Roman chef Enrico Casini, situated near Seggiano in the glorious landscape of the Val d’Orcia, whose timeless hills and valleys are deservedly a UNESCO World Heritage site. Enrico used to run six restaurants in Rome before settling down in his beloved Tuscany and his amazing four course meals every evening were a true highlight of our stay (we also did a cooking class with him – recipes appearing on the blog shortly, yay!).

Antica Tenuta Le Casacce - photography by www.paolathomas.com

Antica Tenuta Le Casacce - photography by www.paolathomas.com Antica Tenuta Le Casacce - photography by www.paolathomas.com

Antica Tenuta Le Casacce - photography by www.paolathomas.com

Antica Tenuta Le Casacce - photography by www.paolathomas.com

Antica Tenuta Le Casacce - photography by www.paolathomas.com

Linda Bass of Tuscan Muse offers a selection of creative workshops in conjunction with Enrico based at Le Casacce. Retired trial lawyer Linda is warmth and generosity personified – nothing was too much trouble – and a fabulous writer, artist and photographer in her own right. Her workshops include not only first class instruction but also a number of day trips to the small hill top villages which dot the surrounding hillsides.

However, with accommodation and surroundings like this, it was nearly impossible to drag ourselves away. Come and visit this little corner of paradise. Oh and meet Socrates, the resident manic depressive donkey and star of Le Casacce.

Antica Tenuta Le Casacce - photography by www.paolathomas.com

Antica Tenuta Le Casacce - photography by www.paolathomas.com

Antica Tenuta Le Casacce - photography by www.paolathomas.com

Antica Tenuta Le Casacce - photography by www.paolathomas.com

Not a bad view from the pool.

Antica Tenuta Le Casacce - photography by www.paolathomas.com

Antica Tenuta Le Casacce - photography by www.paolathomas.com

Antica Tenuta Le Casacce - photography by www.paolathomas.com

Antica Tenuta Le Casacce - photography by www.paolathomas.com

Not a bad view from the terrace.

Antica Tenuta Le Casacce - photography by www.paolathomas.com

Antica Tenuta Le Casacce - photography by www.paolathomas.com


Antica Tenuta Le Casacce - photography by www.paolathomas.com

Here’s Jamie coaching Deepa from One Small Pot.

Antica Tenuta Le Casacce - photography by www.paolathomas.com

Antica Tenuta Le Casacce - photography by www.paolathomas.com

And here are Linda and some of the ladies working hard.

Antica Tenuta Le Casacce - photography by www.paolathomas.com

Antica Tenuta Le Casacce - photography by www.paolathomas.com

Antica Tenuta Le Casacce - photography by www.paolathomas.com

The old stone buildings were charming inside too.

Antica Tenuta Le Casacce - photography by www.paolathomas.com

Here’s the ghost of a photo studio at night.

Antica Tenuta Le Casacce - photography by www.paolathomas.com Antica Tenuta Le Casacce - photography by www.paolathomas.com

The Minx would have loved the wooden cats hanging out outside.

Antica Tenuta Le Casacce - photography by www.paolathomas.com

Antica Tenuta Le Casacce - photography by www.paolathomas.com

Here’s Chef Enrico presenting his incredible food.

Antica Tenuta Le Casacce - photography by www.paolathomas.com

Antica Tenuta Le Casacce - photography by www.paolathomas.com Antica Tenuta Le Casacce - photography by www.paolathomas.com

And here’s Ilva being Ilva.

Antica Tenuta Le Casacce - photography by www.paolathomas.com

Antica Tenuta Le Casacce - photography by www.paolathomas.com

And a couple more of Socrates gambolling in the sunset. Life is sweet at Le Casacce.

Antica Tenuta Le Casacce - photography by www.paolathomas.com

Antica Tenuta Le Casacce - photography by www.paolathomas.com

If you’re looking for somewhere to stay in Tuscany, I can’t recommend Le Casacce highly enough. And Linda’s Tuscan Muse creative workshops are pretty special too, as you’ve probably already worked out.

Share

The Launch of DXV, Or 150 Years of Design History in Cocktails


Launch of DXV - photography by www.paolathomas.com

One of  our lovely sponsors on #blogtournyc was DXV, a new luxury kitchen and bathroom brand from American Standard. As part of BlogTour we were invited to visit their stunning new showroom in the heart of New York’s Flatiron district (usually by appointment only).

DXV celebrates American Standard’s rich 150 year history and heritage by organising its initial collections of fixtures and fittings around four separate design ‘movements’ – blending the design aesthetic and artisanal qualities of the past, with the performance and design requirements of the modern consumer.

At the launch party in New York, even the cocktails were themed appropriately and I was lucky enough to be given the recipes, devised by ace mixologist Elayne Duff. Obviously any opportunity to make, photograph and drink cocktails is not to be passed up in a hurry.

So welcome to 150 years of design history in bathroom fixtures brought to you via the medium of classic cocktails with a contemporary twist (you can’t say we don’t spoil you).

 Launch of DXV - photography by www.paolathomas.com

And here’s Elayne shaking up a storm! (Photos of Elayne by Vladimir Weinstein Photography)

CONTEMPORARY

First up is the Contemporary era, representing the years 1990 onwards. In design terms, this constantly evolving aesthetic combines minimalism and rich texture, individual style and natural forms. The photos representing each design era were taken at the DXV showroom.

Launch of DXV - photography by www.paolathomas.com

Interpreting this them through cocktails, Elayne chose a modern twist on the Scofflaw using raspberry syrup instead of the traditional grenadine.  This cocktail was new to me and apparently dates back to Paris in the Prohibition era – if you were drinking cocktails at the time you were scoffing at the law – but also nods to today’s love of bourbon.

Launch of DXV - photography by www.paolathomas.com

This is an easy cocktail to make as it doesn’t contain too many esoteric ingredients, and it’s one I’ll make again and again. The earthiness of the bourbon is softened a little by the sweet raspberry syrup (I bought mine, though you could make your own) while the addition of bitter citrusy flavours in the form of dry vermouth and lime juice ensures that it is not too sweet.

Scofflaw
Serves 1
A contemporary twist on the classic Scofflaw
Write a review
Print
Ingredients
  1. 1.5 oz Bourbon
  2. 1 oz dry vermouth
  3. 1 oz raspberry syrup
  4. 0.75 oz lime juice
  5. 3 dashes orange bitters
  6. Fresh raspberries to garnish
Instructions
  1. Chill a coupe
  2. Fill a cocktail shaker with ice
  3. Measure in the ingredients
  4. Shake well
  5. Strain into the glass
  6. Garnish with raspberries
mirror mirror http://mirrormirrorblog.com/site/
MODERN

Next up is the Modern era representing the post-war years between 1950-1990. The design of this era was marked by experimentation and individuality,and the interplay between flowing lines, curving forms and geometric structures.

Launch of DXV - photography by www.paolathomas.com

Elayne was inspired to create a traditional Mai Tai to represent this movement in a nod to jet age travel and the  ‘tiki’ culture of those decades.

Launch of DXV - photography by www.paolathomas.com

A Mai Tai can so often be overly kitschy, festooned with little umbrellas, cherries, pineapples and tropical flowers. The drink too is often adulterated with pineapple juice, orange juice or grenadine but this is a sophisticated and very more-ish version – luscious, strong and not too sweet. I will also be eternally grateful to this recipe for introducing me to orgeat syrup, made from apricot kernels and tasting like marzipan in a bottle.

Mai Tai
Serves 1
A classic Mai Tai without the kitsch
Write a review
Print
Ingredients
  1. 2 oz aged rum
  2. 1 oz lime juice
  3. 0.75 oz orgeat syrup
  4. 0.75 oz orange Curacao
  5. 0.25 oz dark rum
Instructions
  1. Chill a double rocks or other large glass
  2. Fill a cocktail shake with ice
  3. Add ingredients and shake
  4. Strain into glass over plenty of crushed ice
  5. Garnish with a lime wedge and a flower
mirror mirror http://mirrormirrorblog.com/site/
GOLDEN ERA

The Golden Era covers the pre-war years from from 1920-1950. In design this is the classic era of Art Deco where a spirit of experimentation was combined with industrial design to produce a thoughtful, refined aesthetic, based on simple geometric shapes and reduced ornamentation.

Launch of DXV - photography by www.paolathomas.com

In cocktail terms Elayne paid homage to that era’s obsession for gin with the Corpse Reviver. I’m not a big fan of gin-based cocktails – they can often get a bit too floral and grannyish for my tastes – but this was GOOD, given extra layers of bitterness, sourness and sophistication by the Cocchi Americano (used instead of Lillet), lemon juice and absinthe, with an orange twist instead of the traditional cherries.

Launch of DXV - photography by www.paolathomas.com

Corpse Reviver
Serves 1
A contemporary twist on the classic Corpse Reviver
Write a review
Print
Ingredients
  1. 0.75 oz London dry gin
  2. 0.75 oz Cointreau
  3. 0.75 oz Cocchi Americano
  4. 0.75 oz lemon juice
  5. dash of Absinthe
  6. Orange twist to garnish
Instructions
  1. Chill a coupe
  2. Fill a cocktail shaker with ice
  3. Add all ingredients and shake
  4. Strain into chilled glass
  5. Garnish with an orange twist
mirror mirror http://mirrormirrorblog.com/site/
CLASSIC

The final DXV movement represents the Classic era, representing the years 1880 to 1920 which saw a convergence of opulence and modern technology, and an emphasis on artisanal craftsmanship. In this, the era of Art Nouveau, design pushed beyond the rigid geometry of neoclassicism and became more intricate and organic.

Launch of DXV - photography by www.paolathomas.com

Elayne Duff chose to celebrate the communal drinking of this era to create a traditional rum punch and here she is serving it at the launch party. The recipe for this looks really interesting and I’m definitely going to try it our at our next summer party. If it works I’ll share it in a future post.

Launch of DXV - photography by www.paolathomas.com

For more about the DXV collection and its design inspirations check out this video. I don’t normally like to share ads on this blog, but the visuals on this are mesmerising.

Share

Weekend Link Love

InstagramApril (5) 2014

It’s been a week of unseasonably hot and sunny weather here in Seattle, with lots of gardening (or at least gardening plans), grilling on the deck and glorious golden hour walks by Green Lake. Also frustrating problems with technology – updating the operating system on my phone required it to be taken back to factory settings (seriously Apple?) and it still hasn’t fully recovered from its ordeal (and neither have I), and my computer has been most unhappy.

Last weekend I attended a class at the Pantry at Delancey on Square Foot Gardening which was hugely inspiring and went to the Seattle Tilth Edible Plant Sale  (one more day tomorrow)  yesterday evening to buy new plants for my raised beds. Stand by for Instagram pictures! The botanical theme continued with an evening at The Little Shop of Horrors. A really good production with a uniformly excellent cast that I highly recommend to Seattle folk.

Tacos - photography by www.paolathomas.com

Finally it’s also been a very taco-y week. I had great fun running round Seattle shooting Seattle’s Ten Best Tacos for Zagats and discovering some seriously good taco trucks. And this morning the Minx and I took a kid’s taco-making class at the Pantry. Above is one of the tacos we made from scratch, while the Minx got absorbed in her guacamole. I’ve just invested in a serious tortilla press. Heaven knows where I’m going to put it.

Tacos - photography by www.paolathomas.com

And finally a few fun links:

Deep clean your Facebook page. Have added this to my To Do list.

Apparently walking enhances creativity, I’d be out there if it ever stopped raining today.

My friend Tina at LifeInSketch is hosting the most amazing competition to win a trip to New York and meet A-list interior designer Vicente Wolf (whose new paint colours are GORGEOUS). I won’t be able to enter as I will be in Europe on the day in question, so now you guys stand a chance. Ha!

Yet another fabulously good photography portfolio.

On the blog this week I made Candied Kumquat Panna Cotta from Peasant in NYC and we learned about John Ruskin through the medium of kitchen cabinets.

Share

Panna Cotta with Candied Kumquats from Peasant NYC

Panna Cotta with Candied Kumquats from Peasant NYC - photography by www.paolthomas.com

Recognise that platter?  It was my purchase from dBo Home last seen gracing the wall here.

On the first evening on #BlogTourNYC – still reeling from visiting Michele Varian’s shop – we were led down some steps in NoLiTa and a wondrous sight met our eyes at Peasant NYC. Wineglasses and goodie bags. What else does a woman need?

Peasant NYC - photography by www.paolathomas.com

The long worn tables were in Peasant – a wonderful subterranean Italian restaurant, full of atmosphere and candles (and fiendishly difficult to photograph as a consequence).

The food throughout was fabulous – an array of gorgeous salads and other antipasti served family style, followed by superb gnocchi and pastas – and the wine kept flowing in the most ridiculous way.

Peasant NYC - photography by www.paolathomas.com

Peasant NYC - photography by www.paolathomas.com

This was the stage in proceedings when I realised that #BlogTourNYC might be a bit heavy on the liver.

The highlight of the evening though (aside from starting to really get to know all my new found friends, natch) was the stunningly good panna cotta with candied kumquats that we were served for dessert. As an Italian I consider myself something of an expert in the ways of panna cotta, but this was exceptional – the smooth, sweet creaminess marrying perfectly with the citrusy bite of the candied kumquats, which I had never tasted before.

Peasant NYC - photography by www.paolathomas.com

After we got back I idly asked Veronika Queen of BlogTour if it might be possible to get the recipe and Veronika being Veronika, the next thing I knew, the owners of Peasant were emailing the recipe to me.

And so dear hearts, here I am sharing with you. You guys, this is SERIOUSLY worth candying kumquats for. You can’t ever say we don’t spoil you on this blog.

Peasant NYC - photography by www.paolathomas.com


Candied Kumquat Panna Cotta
Serves 6
A delightfully smooth and creamy panna cotta with an intriguing topping of candied kumquats in syrup.
Write a review
Print
For the Panna Cotta
  1. 2 gelatin sheets (I used 1 sachet of powdered gelatin softened in 2 tablespoons of water)
  2. 4 cups heavy (double) cream
  3. 1/2 cup baker's (caster) sugar
  4. 1 vanilla bean (split)
For the Candied Kumquats
  1. 1 pound kumquats
  2. 2 cups water
  3. 2 cups sugar
For the Panna Cotta
  1. Soften the leaf gelatin in 1 cup of cool water for 5 minutes and drain. Alternatively sprinkle a sachet of gelatin in the water and leave for 5 minutes until soft and spongy.
  2. Bring the cream to the boil in a heavy saucepan and remove from the heat before it bubbles over.
  3. Stir in the sugar and the vanilla bean and then whisk in the softened gelatin, making sure it is thoroughly mixed in.
  4. Discard the vanilla bean.
  5. Pour the mixture into six 1 cup (8 fl oz) ramekins, which have been lightly greased with a flavourless oil.
  6. Refrigerate for at least 6 hours or overnight.
For the Candied Kumquats
  1. Fill a medium-sized heavy bottom saucepan halfway with water and bring to the boil over a high heat.
  2. Drop the kumquats into the boiling water and blanch for one minute.
  3. Drain the kumquats in a colander and discard the blanching water. Clean and dry the pot.
  4. The little nubs on the kumquats where the stems were can be easily rubbed off at this stage.
  5. Put the sugar and water into the pot and bring to the boil over a medium high heat.
  6. Reduce the heat to medium and add the blanched kumquats.
  7. Simmer the kumquats in the syrup for 45 minutes to 1 hour until their skin is soft and translucent. Keep an eagle eye on them to make sure that they only just simmer. If they start boiling, they will collapse and get wrinkly (ask me how I know).
  8. Remove the candied kumquats to a glass jar.
  9. Simmer the candying liquid over a medium-low heat for another 10 minutes or so until it turns into a thick syrup (stop cooking before it browns otherwise you'll end up with a delicious citrusy toffee - again ask me how I know).
  10. Pour the syrup over the kumquats in the jar and leave to sit until cooled.
  11. Cover and store in the fridge for several weeks.
To serve
  1. Unmould the panna cottas on dessert plates and spoon the candied kumquats over each one.
To serve
  1. Unmould the panna cottas onto dessert plates and top with the candied kumquats and syrup. Eat greedily.
mirror mirror http://mirrormirrorblog.com/site/
Peasant NYC - photography by www.paolathomas.com

Share

Weekend Link Love

Double Rainbow Over Seattle - photography by www.paolathomas.com

It’s been a week of sunsets and showers, flowers and sunshine, hot cross buns and Cadbury’s Mini Eggs – and the most extraordinary rainbow that I think I’ve ever seen. And you really can’t get much better than that. (Also it’s astonishing what one can do nowadays with the pano feature on the iPhone).

InstagramApril2014

I will be spending the weekend baking a Simnel cake and hosting a traditional Easter Sunday lunch with lots of roast lamb for some British friends here.

Simnel Cake photography by www.paolathomas.com

If you want to do the same, my recipe for Simnel cake – the traditional English Easter cake – is here.


If you want to make dye eggs using natural dyes, my friends Leigh and Pamela had fun this week.

This his and hers food photography is insanely beautiful.

Saveur magazine came up with this list of the best food blogs around. I’m looking forward to looking and drooling.

Brene Brown and Chase Jarvis did an amazing interview about Unlocking Your Creativity  which is worth watching in its entirety.

Here’s a little post on capturing authentic ‘moments’ with photography. I always think my photography is too contrived, so this is something I’m striving for.

And here’s an interesting piece on how Facebook manages its filtered feed, though not terribly helpful for those of us trying to get even a few organic viewers to our Facebook pages.


On the blog this week, we discussed New Trends in Kitchen Design, read Don Draper’s Tarot Cards and worked out how Mad Men is going to end, visited Bunny William’s amazing New York shop Treillage and the Skagit Valley Tulip Festival, and had a stressful time baking a Roller Skate Cake.

Hope you are all having a wonderful and relaxing weekend.

Share

The Roller Skate Cake


AKA my most stressful experience to date this year.

Roller Skate Cake - photography by www.paolathomas.com 

As you may remember we have a tradition of making crazy birthday cakes around these parts.

I believe it’s quite an English thing to do – I remember my mother and my friends’ mothers doing it for us when we were children – and it’s something I’ve always tried to do with the Minx.

She’s lucky in this regard that she doesn’t have brothers or sisters though, things would be far less elaborate if I had to do this more than once a year.

This year the Minx, who is now aged nine, had a very active say in the design.  The theme was rollerskates – as befitted a party at the rink –  though I wasn’t allowed just to use a skate shaped pan. The whole thing had to be as garish as possible, naturally, and since she had been very admiring of the cake I made for her friend we incorporated elements of that in the design too. 

Since neither she nor I are particularly fond of fondant icing either, making skates out of fondant wasn’t an option and we were both inspired when we found a cake online that had made use of roller skate sugar cookies, a decision that I may have regretted later. Let’s just say that when a grown up Minx is in therapy complaining about her childhood, I will point her in the direction of this blog post.

Roller Skate Cake - photography by www.paolathomas.com

I started off in my usual way by buying a rollerskate candy mould and using Wilton’s Candy Melts in white and pink. A little bit of judicious piping later and I had a collection of bespoke cake decorations. I can’t tell you how grateful I was to have these to hand later in the process.

Roller Skate Cake - photography by www.paolathomas.com

I also bought a roller skate cookie cutter and proceeded to make thirty roller skate cookies with the intention of using some to decorate the cake and handing the rest out at the party. The Joy of Baking’s trusty sugar cookie recipe was my guide and mentor here, though I was a bit worried as they looked a bit like trains initially.

I am not an experienced cookie baker so the whole family joined me in outlining, flooding and frosting the cookies. I hit upon the idea of using pink Wilton Candy Melts as wheels and an edible colouring pen for the laces otherwise I would be there icing them still. As it was I was totally OVER the whole project by the time these were done, but still had a whole cake to make and frost.

Roller Skate Cake - photography by www.paolathomas.com

The day before the party I started to make the cakes with the intention of having at least the crumb coat done the evening before. I again used the wonderful Mom’s Chocolate Cake recipe from the first Macrina Cookbook, since its moist, rich, chocolate-yness (helped by using the amazing Pernigotti cocoa powder from ChefShop) is adored by kids and adults alike and it is extremely forgiving of being shoved into a variety of different shaped pans. (One day I WILL write the recipe down here as I refer to it so often).

Unfortunately I made a big miscalculation in working out how much mixture I would need to make two tiers and by the evening I only had half the number of cakes you see here (the bottom big cake and the bottom small cake). So I was up late baking extra cakes to give the cake the required depth. I was SO starting to regret this endeavour by this stage.

Roller Skate Cake - photography by www.paolathomas.com

It was not until 9.30 am, with the party at lunchtime, that we finally got to the ‘crumb coat’ stage – a rough layer of buttercream that keeps all the crumbs at bay, holds the cakes together and after chilling, gives you a nice smooth surface for further decoration.

Roller Skate Cake - photography by www.paolathomas.com

Doing the different spotty icings as seen in my Easy Cake Decorating blogpost (still by far my most pinned post on Pinterest), is simple and hugely effective, but it is not a quick process as you are manipulating six or seven different bags of frosting and covering only a tiny part of the cake at a time.

So by the time that part of the cake was completed we were really up against it time-wise.

I had intended to ice bigger colourful swirls on the bottom layer of the cake, but by that time the frosting was getting meltier and meltier and the swirls of icing were just dropping off the cake. With twenty-five minutes to go before we needed to be on the freeway to get to the skating rink, the bottom layer of the cake was a sorry disaster – half-frosted and sort of weeping misshapen blobs of icing. I wish now I’d taken a picture but photography was the furthest thing from my mind at that point.

The only thing left to do was to take my trusty offset spatula and quickly spread the melty frosting blobs into incoherent, messy but at least colourful swirls on the bottom layer of the cake and hope that the roller skate candies would cover things up a bit.

They did the job, the cake looked better than I could possibly have hoped and we were even able to chill it for 15 minutes before heading out the door.

Roller Skate Cake - photography by www.paolathomas.com

I myself had aged approximately a hundred years in the process but I suppose the joy on the faces of the Minx and her friends was worth it.

I suppose.

Roller Skate Cake - photography by www.paolathomas.com

Thank goodness I have about a year to recover. More of the Minx’s crazy cakes here (Tinkerbell), here (Cinderella), here (Nemo).

The Minx had her own stressful morning. We’d bought her a ‘9’ candle, which we together decorated with sequins to make it suitably garish and cake-appropriate. Unfortunately unbeknownst to me she put it on the radiator to ‘dry’ and couldn’t fathom out where it had disappeared to later. A valuable life-lesson learnt methinks.

Oh and apologies for all the crappy iPhone photos. I think you’ll understand why picking up my big girl camera was the furthest thing from my thoughts during this process.

Share