Food Photography Workshop, Gulf Shores Alabama


It’s already been more than a month since I went to Gulf Shores, Alabama to learn about food photography and styling from the masters (mistresses?) – Helene Dujardin, Senior Photographer at Oxmoor House and of Tartelette blog fame, and Clare Barboza, whose gorgeous photography studio I’ve been renting here in Seattle.


gulfshoresworkshop

 
It’s still difficult to put into words exactly what the weekend meant to me, mostly because I don’t quite yet know myself.  But let’s just say that if you mix mindblowingly beautiful surroundings with a bunch of hugely talented and creative people; throw in sessions of intensely creative work spiced with highly amusing play and season everything with long, leisurely walks on a gorgeous beach, you have a surefire recipe for having your soul turned over just a teeny bit. 
 
 
gulfshoresworkshop-3


I wanted to show you the photos I took while I was there.  Part of my difficulty in summing up my weekend is that I was both immensely inspired and enormously frustrated.

I want to do this. I love doing it. There’s no reason why I shouldn’t be able to do it.  But I’m not quite there yet.

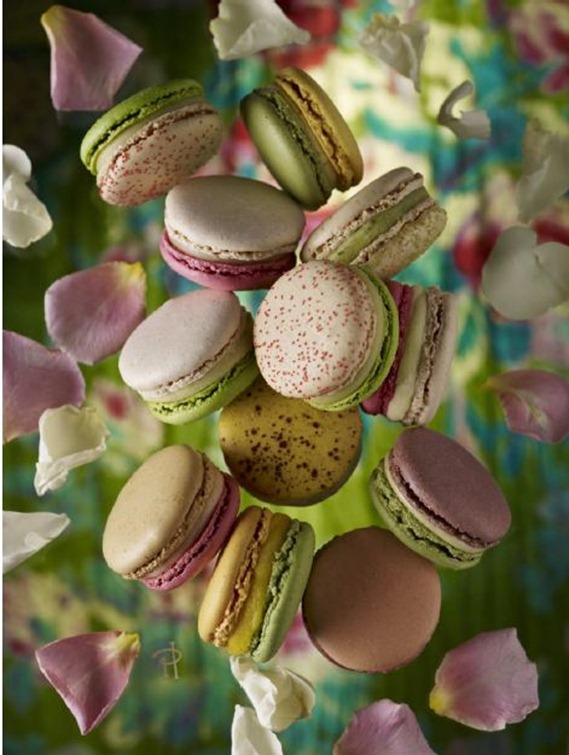
For our first session we talked about using natural light for food photography and the importance of bending it, shaping it, softening it and brightening it, with bounces, scrims and reflectors, to get exactly the effect that we want.  And we were given a bunch of beautiful desserts to play with.

Although many props were available I wanted to style things simply and just focus on playing with light for this session. I know quite a lot about this stuff now after attending so many workshops, but this was actually quite tricky for me as the southern light was so very different from the softer light I’m used to here in Seattle. In Alabama the light had to be scrimmed (using only window blinds) instead of augmented, and finding that sweet spot between harsh and flat was tricky.


gulfshoresworkshop-2


This is one of my favourite pictures that I took.  One of the props, a beautiful cake, got dropped and squashed before we started.  It’s more of a ‘found’ picture than a ‘made’ one – not a lot of styling and propping involved in this one – but it’s a interesting perspective on cake and I loved the way the light plays across and shapes the roses on the top.

For our second assignment we were talking more about composition and propping and had a selection of appetisers to photograph.

I still find propping a table setting so that it looks real yet beautiful to be a challenge, so this was a tricky for me, though it was super fun to play with all of Helene’s glorious props and backgrounds.


cheese


It was in this session that I learned a very valuable lesson. I was so busy making sure that the light on the grapes and on the top of the cheese and on the knife handle looked beautiful, that I omitted to notice that I wasn’t showing any of the bottom of the small pedestal stand the cheese was on and so the cheese looks like it’s hovering a few inches off the table. 

And I managed to do that in every. single. one of the shots I took this session, so they all featured flying saucer cheese, most even more ludicrously than this, with the cheese plate seemingly floating over the knife.

So I ended up submitting a plate of runny cheese and crackers for the critique at the end.


cheese2


Our next assignment was very fun.  After watching a Helene and Clare both give a styling and propping demonstration during which they made it look SO easy, we were told to split into teams of two where we would take it in turns to be the stylist and the photographer, and given two very different real world assignments, so we had to style to spec.

I was paired with the lovely Michael and our first assignment was entitle Diners, Drive-Ins and Dives. I was delighted to find out that he had been on a previous Helene workshop where learned to style the perfect sandwich, so he was the food stylist, I was the photographer and we worked on the prop styling together.

This again was a stretch for me but I was pleased with how this worked out, though it’s not my usual thing.


sandwich


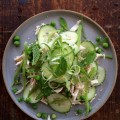
Our next assignment was for something Colourful and Contemporary, so I chose to style the fabulous red lentil soup we’d had for lunch. The gorgeous bowls are from Suite One ceramics (as are the textured cake stand and plate in the cheese shots).  This assignment could have been made for me. I’m starting to realise that my ‘style’ is all about the juxtaposition of light, shape and colour. I was in charge of styling for his shoot and Michael was in charge of photography.  Looking at the photo now, I wish we’d done a little bit more with the light.


lentilsoup


Our final assignment was pretty challenging.  We all had to choose a can of soup and make it look appetising.  Not easy when you see what’s in these things.  In honour of my Italian heritage I decided to go with a minestrone and chose a rustic styling, which again is not quite my usual thing.

I think I made the soup look vaguely edible, but I wouldn’t exactly call it appetising. What are those pallid beige cubes floating around in there?


minestrone


Do you know what the single most inspiring thing about this weekend was though?  Meeting Helene. You already know from her blog that she’s funny, charming, delightful and talented, but in real life she just crackles with enthusiasm and energy and she’s just so darn good at her job. Watching her prop a shoot, with meticulous attention to detail, knowing just where to put each element and making it all look so easy, is quite simply awe-inspiring. (I will gush separately about Clare when I recap the Whidbey Island workshop).

If you’re interested in this stuff and can get to one of her workshops you really mustn’t hesitate.

And what was my ultimate takeaway from the event? It showed me that I really, really, REALLY want to do this.  I find the whole interplay between food, tableware, light, colour and composition to be endlessly fascinating and challenging.  I could do it all day.

So I’m putting it out there to the universe now.  I want to be a food photographer.

Stay tuned.

With heartfelt thanks to Laura Vein and Libby Stephens who made the most unbelievable food and looked after us all like mother hens all weekend (oh and buy Laura’s preserves – they are divine). And thanks also to Marilyn, Jerry, Tiffany, Gale, Janice, Karen, Serina, Paula, Nancy, Michael, Sharon and Kara for being such hugely fun, talented and inspiring companions.

Share

Wonderful Whidbey Island


whidbeyisland-18

No Photoshop filters were harmed in the construction of this photo.  It really did look like this.


I’ve been feeling just a tad overwhelmed over the last week or so – moving eleventy million tons of STUFF back into the remodeled kitchen and bathroom; shooting some pics for a friend’s cookbook (yay!); holding the fort while the Husband was in China and generally rushing about like a crazy person.


whidbeyisland-20


So when the lovely Clare Barboza told me there were still places left on her 2013 Farm to Table Photography Workshop this weekend on glorious Whidbey Island (just across the water from Seattle), I was wondering whether it might be a bridge (or indeed a ferry ride) too far.


whidbeyisland-2


But with the aid of some dear friends taking the Minx for a sleepover, a wonderful Husband babysitting through his jetlag and some frantic late night packing I managed to make it work.  And I was SO very glad I did.


whidbeyisland


whidbeyisland-2

whidbeyisland-3 whidbeyisland-4

whidbeyisland-5


I met some mindblowingly talented and just plain delightful women, ate fabulous food (thanks to the amazing Sean, Joe and Christine), drank too much wine; enjoyed gorgeous weather, sunsets, rainbows and scenery; and generally spent some quality time with my camera, which I always find to be incredibly soothing for my soul. We stayed at at the exceptionally comfortable Willow Pond Lake House; visited two farms –  Willowood, where they grow organic vegetables and Little Brown Farm where they keep goats and make the most delicious cheese and butter; shopped at the very cute Bayview Farmer’s Market and then got to style and shoot the farm produce.


whidbeyisland-15

whidbeyisland-13 whidbeyisland-14

whidbeyisland-6

whidbeyisland-9

whidbeyisland


whidbeyisland-8

whidbeyisland-10


As with the Gulf Shores workshop I have MUCH to think about and process (and I will be blogging both at much more length), but in the meantime here are a few photos of the gardens at the house and from a pond nearby.

Can you see now why I loved it so much?


whidbeyisland-19


whidbeyisland-11

Many thanks to Melissa (seen squatting above), who taught me how to ‘paint’ beautiful abstracts like this.

Stay tuned for the full story of the baby vegetables and the baby goats.

Share

Gulf Shores Food Photography Workshop


Sometimes you have weekends that are almost impossibly inspiring; good for the deepest depths of your soul and quite possibly life changing.


gulfshores-16


This last weekend I attended a food photography workshop in Gulf Shores Alabama, with the amazing Helene Dujardin of Tartelette (and Senior Photographer at cookbook publisher Oxmoor House) and the equally amazing Seattle-based food photographer Clare Barboza. 


gulfshores-10

gulfshores-17

gulfshores-27 

I’m still processing what exactly the workshop meant to me (there’ll be a blog post with the images I took later this week), but one of the most quietly inspiring and good-for-the-soul aspects was the location.  Who knew that Gulf Shores, Alabama was so incredibly beautiful?


gulfshores-13


Every day, we took walks on the enormous, blindingly white, sparkly sand beach – like dunes of soft sugar – and admired the seabirds and the soft pastel colours of the seagreen waves, the seashells and the pretty wooden houses on stilts, lined up like so many macarons on the water’s edge (I’m clearly in a dessert-y frame of mind). 


gulfshores-23


gulfshores-8


It was one of those places that always looks different depending on the light, but always equally enchanting.


gulfshores-3


Gulf Shores, I’m so sorry I doubted you.

Come take a walk with me.


gulfshores-5

gulfshores-15

gulfshores

gulfshores-7

gulfshores-24

gulfshores-12

gulfshores-28


The name of the house where we were staying seemed hugely appropriate.


gulfshores-25


And I wondered if the clouds on the flight back were telling me something.


gulfshores-26


Check out Clare Barboza’s blog post, to see what fun we had.  And here’s another blog post from my lovely classmate Jerry Deutsch. I met such fabulous people on this weekend.

   
Share

Roasted Pumpkin and Coconut Soup with Thai Flavours


This velvety, rich, sweet and downright luscious soup fits right in with my attempts to eat paleo (ie. omit all grain-based carbs) while not feeling remotely deprived, and my current obsession with the awesome kubocha pumpkin, which is dense and filling and absolutely packed with flavour and nutrients (however any flavourful pumpkin or squash would do here).

By the way, I have no idea what I’m doing when it comes to Thai cooking, so if you’re expert please don’t snigger at the back. All I know is that these flavours taste delish and their brightness and freshness cuts through the creamy, sweet soup perfectly.


Pumpkin and Coconut Soup


INGREDIENTS

(Serves 4)

4-6 cups of peeled pumpkin or squash (cubed)

1 tablespoon olive oil or melted coconut oil

Salt and pepper to taste

A few branches of thyme


Pumpkin and Coconut Soup


2 tablespoons coconut or olive oil

1 large onion, thinly sliced

2-3 plump cloves of garlic, minced

1-2 fresh green chilis, finely chopped

4 inch piece of lemongrass, finely chopped

A small handful of Thai basil (or normal basil), finely chopped

3-4 lime leaves

This is the perfect place for one of those small boxes of fresh herbs from the supermarket entitled ‘Thai Flavours’ or some such. If you can’t find that I’ve made this with a couple of tablespoons of Thai green curry paste in place of the lemongrass, basil and lime leaves.

1 can light coconut milk

2-3 cups of good chicken stock (I use my own bone broth)

Chopped coriander (cilantro) and spring onions (scallions) to garnish.


Pumpkin and Coconut Soup


Method


Roasted Pumpkin

Place the pumpkin cubes on a baking sheet, sprinkle with the olive oil or melted coconut oil and rub it into the pumpkin cubes with your hands until everything is well anointed. Season with sea salt (I use Maldon) and freshly ground pepper to taste and add a few branches of thyme.

Bake in the oven at 200 degrees C (approx 400 degrees F) until the pumpkin is soft and golden brown round the edges.

(You don’t have to roast your pumpkin, but it really does bring out the flavour).


Pumpkin and Coconut Soup Pumpkin and Coconut Soup


While your pumpkin is roasting, start to caramelize your onions.

Heat the oil in a large soup pot, add the onions, garlic, chili, lemongrass, basil and whole lime leaves and cook gently until the onions are a soft and have turned rich golden brown, being careful not to burn them.

When the onions are done, add the roasted pumpkin cubes (or raw pumpkin if you prefer), the coconut milk and 2 cups of bone broth and bring everything to a simmer. Cook for around five minutes, or until the pumpkin is soft if using raw pumpkin, and then fish out the whole lime leaves.

Using an immersion blender or liquidiser, blend the soup until it is thick and creamy.  Add more broth as necessary depending on the texture you like your finished soup to be.

Serve piping hot, garnished with chopped onions and coriander (cilantro). Obviously garnishes are optional, but the crisp green crunchiness really complements the earth, creamy soup.

Enjoy!

   
Share

Palm Springs Uptown Design District Shopping and Dining Guide


I’m off to Vancouver tomorrow bright and early for a weekend with friends, so I thought it was about time I posted up the last of my images from Palm Springs, before I get a whole bunch of new ones.


palmspringsuptowndesigndistrict-16


Truth be told, last time we went to Palm Springs we had been a bit disappointed by the shopping and dining out options. We visited some great places, yes, but overall the downtown area came across as a bit tired and down at heel – resting on its laurels from a bygone era, like a vacationing grandma.

Clearly we weren’t the only people who felt like that because in the intervening three or so years since we were last there a whole district of fabulous shops and boutiques, art galleries, vintage furniture stores and cool restaurants has sprung up – the Palm Springs Uptown Design District, on North Palm Canyon Drive.

The area begins north of Cheeky’s – breakfast here is still a highlight of any trip to Palm Springs, though be sure to get there early as the lines are LONG.

On the other side of the street from Cheeky’s is Copley’s which has a beautiful outside terrace on which to drink superb cocktails and eat excellent food.  The highlight for us, though, was the fabulous sticky toffee pudding that British chef Andrew Copley has snuck onto the menu.


palmspringsuptowndesigndistrict-13 palmspringsuptowndesigndistrict-2


palmspringsuptowndesigndistrict-15


We were told by a shop owner that Trio, just north of Copley’s on North Palm Canyon Drive had spearheaded the development of the area, and it certainly was a fabulous place to eat, big and bustly, with a fun and funky interior, impeccable friendly service, and a menu full of upmarket comfort food (and truly excellent mac ‘n cheese for the Minx).

North of Cheeky’s you’ll find some extremely cool vintage furniture stores and Jakes restaurant. We didn’t have a chance to eat at Jakes –  though we stuck our heads in and it looked like fun – but it comes highly recommended by people we met at the hotel.


palmspringsuptowndesigndistrict-24

palmspringsuptowndesigndistrict-12 palmspringsuptowndesigndistrict-14


palmspringsuptowndesigndistrict-19


Carry on walking and you’ll reach a small Spanish style hidden courtyard, where’ll you find the fabulous NotNeutral store, selling beautifully designed contemporary homewares. Originally conceived as a temporary pop-up shop, it’s now a perfect fit in the design district. We could have bought the whole store and nearly did.


palmspringsuptowndesigndistrict-4

palmspringsuptowndesigndistrict-5 palmspringsuptowndesigndistrict-3


The courtyard also hides the glamorous interior of Workshop Kitchen + Bar. We really enjoyed this restaurant, from the cool décor to the duck fat fries, the use of seasonal ingredients, the excellent cocktails and the ‘large format’ options, which led to the family sharing a large platter full of mustardy chicken and delicious vegetables.


palmspringsuptowndesigndistrict palmspringsuptowndesigndistrict-20

The pop-up store concept thrives at Raymond Lawrence.  Named for the delightfully friendly owners they feature a number of pop-up collections in their quirky store.

We fell in love with these limited edition portraits of vintage Barbies by Judy Ragagli.  The cutie in the middle with the curled brown hair ended up coming home with us.


palmspringsuptowndesigndistrict-6


palmspringsuptowndesigndistrict-22


The jewel of the design district is Palm Springs designer Trina Turk’s huge eponymous store, featuring women’s and men’s fashions and  the world’s most colourful homewares. Spent a lot of time ogling cushions here.


palmspringsuptowndesigndistrict-7 palmspringsuptowndesigndistrict-8
palmspringsuptowndesigndistrict-9 palmspringsuptowndesigndistrict-10

palmspringsuptowndesigndistrict-25


palmspringsuptowndesigndistrict-11 palmspringsuptowndesigndistrict-18


With the development of the design district, Palm Springs has just become even more fabulous, if rather dangerous for the wallet and waistline.  I for one can’t wait to go back and am fascinated to see how it develops over the next few years.


palmspringsuptowndesigndistrict-23

   
Share

Paleo-Friendly Oxtail and Pumpkin Stew


oxtailpumpkinstew-3


As I mentioned I’m trying to be more ‘paleo’ in my eating, which essentially means cutting out all grain-based carbs and eating primarily meats, nuts and vegetables. Pumpkins and other squashes are allowed and they provide some much needed starchy bulk in the diet. So when I came across a recipe for Oxtail and Pumpkin Stew in Yotam Ottolenghi’s eponymous first cookbook, which seems to fit the diet perfectly, I was all over it like a rash.


oxtailpumpkinstew


The joy of this recipe comes from the unusual spicing – the earthiness of the wine-stewed meat melds with the sweetness of the pumpkin and aromatics like orange, cinnamon and star anise and just melts in your mouth into layer upon layer of sumptuous flavour. This dish truly is like nothing else I’ve ever eaten.  Kids and husbands adore it too.

Since this is a stew there is no need to be exact with the ingredients. Add all items ‘to taste’. Whatever you do, it will all cook down into a bowl of scrumptious deliciousness. Also do not be put off by the longish list of ingredients. Prep time is not long and the hardest part about the dish is waiting for the darn thing to cook already. And your house will smell AMAZING.


Ingredients (Serves 6)

2 tablespoons of your favourite oil or fat for frying (Ottolenghi uses olive oil, I used paleo-recommended lard)
Approximately 1.5 to 2kg (3-4lbs) oxtail pieces (I used 3 supermarket packs)
4-5 shallots or half a large onion, roughly chopped
3 large carrots, cut in large chunks
2 large cloves garlic, crushed
500ml (approx 2 cups) red wine
650g Italian chopped tomatoes (I used 1 large can)
10 sprigs thyme and 5 sprigs rosemary, tied in a bundle
Zest of half an orange, peeled in long strips
2 bay leaves
2 cinnamon sticks
2 star anise
1 teaspoon coarsely ground pepper
500g peeled pumpkin or butternut squash, peeled, seeded and cut into 2-3cm chunks (I used my favourite kubocha pumpkin, but any other flavourful pumpkin or butternut squash would do)
300ml water
Salt to taste

Gremolata (optional)
4 tablespoons chopped fresh parsley
1 large clove garlic, very finely chopped
Grated zest of 1/2 lemon


oxtailpumpkinstew


If using, preheat the oven to 180°C or 350 F.  I, however, cooked my stew in the slow cooker in the 6 quart bowl. This is perfect slow cooker fodder.

Heat the fat in a large deep frying pan (if you will be transferring everything to the slow cooker afterwards) or directly into a large ovenproof casserole dish with well-fitting lid (be warned, this stew is BIG).

When the oil is hot, brown the oxtail pieces on all sides and transfer them to a colander so any excess fat is drained away. Do this in batches otherwise the pieces will boil in their juices rather than fry.

Remove all but 2 tablespoons of fat from the pan and then add the shallots, carrots and garlic. Saute’ over a medium high heat for 10mins or so or until golden brown, stirring from time to time.

Add the wine and bring to a boil, scraping any browned bits from the bottom. Cook until nearly all the wine has evaporated.

Add the canned tomatoes, herb bundle, orange zest, bay leaves, cinnamon, star anise, pepper and salt to taste.

Place the oxtail pieces on top and cover with a large piece of baking paper placed directly on the oxtail. Cover the casserole securely with a heavy lid and bake for 2-3hrs, or until the meat comes away easily from the bone.  Or reunite the oxtail and vegetables in your slow cooker and cook on LOW for about 8 hours or until the meat slides easily off the bone. I prepare mine in the morning and leave it gently cooking all day.

When the stew is cooked fish out the oxtail pieces and set them aside.  Ottolenghi suggests picking the meat off the bones but you really don’t need to.  One of the great joys of life is sucking oxtail bones I find (why does this seem so suggestive?).  Also fish out the herb bundle and the orange slices and bayleaves.

Add the pumpkin or butternut squash pieces to the sauce and  add the water if the dish seems dry, which it probably won’t if you’ve used the slow cooker.  Bring to a simmer and cook, uncovered, for 30mins or until the pumpkin is tender. Season to taste.

Meanwhile, mix the parsley, lemon zest and garlic together to make the gremolata. Traditionally served over osso buco in Italy the sharpness of the gremolata will ‘cut’ the unctuous creaminess of the stew. Serve the stew in a deep serving dish and scatter the gremolata over the top.

Serve with polenta or mashed potato if you’re not paleo-ing or some roasted cauliflower florets if you are.

   
Share

Project 52: Red Balloons


So last week’s assignment was simple. A concept shot inspired by “Red Balloons’. 

Because I wanted to do something a bit different, and because blowing up balloons makes my cheeks hurt, and because I’m trying to improve my food photography, I decided it might be easiest to just whip up a bunch of cupcakes.


redballooncupcakes


In that I was almost certainly wrong.  Trying to organise and tame that ridicuously curly gift ribbon with tiny bits of sticky tape into strands that might possibly look like they were floating through the air tested my patience to the very limits.  Food and product stylists everywhere, I salute you.

I was worried that the photo above might be insufficiently conceptual, so then dug up a photo I had of a tiny Minx chasing balloons.  I used my still extremely crappy Photoshop skills to turn her into a Brush and included her in the picture.


redballooncupcakes


I wasn’t entirely happy with this shot either as I couldn’t help wishing that the Minx had been stretching up towards the balloons, and the composition just didn’t look right. The Minx thinks it’s fabulous though, so I think I’ll make a canvas copy for her toyroom.

In the end I decided to use the same conceit but have the cupcake balloons wafting in front of the Space Needle.

This involved taking a photo of the Space Needle, converting it to a Brush and then using a mask to reveal the bunch of ribbons.  My Photoshop ‘skills’ pretty much exploded at this point.


redballooncupcakes


To be honest, I think this is my least favourite of the Project 52 images I’ve produced to date, and I’m not sure that red flying cupcakes look particularly appetising, which, after all, is the point of food photography.  But it was a fascinating creative exercise and certainly tested my Photoshop skills, such as they are, to the very limits and beyond.


HOW TO CONVERT AN IMAGE INTO A BRUSH IN PHOTOSHOP

You can convert any image into a brush in Photoshop which gives it an interesting flat effect and means you can colourise it, move it about, multiply it, turn it, stamp your photos with it and do all sorts of jiggery pokery (note use of correct Photoshop terminology).  In fact do all the things you can do with the standard Brushes, but with a photo.

– Use your preferred selection tools to select the area of the image you wish to use.  (I had trouble selecting the Minx as you can see, the Space Needle was much simpler).

–  Go to Select –> Inverse and then delete the areas of the image you don’t want to use, so that you end up with your image on a transparent background.

– Convert the image you want to use to black and white, remembering that grey areas will show up in the brush but white areas will be transparent.

– Adjust contrast etc. to get a good strong B/W image

– Draw a box around the image with Rectangular Marquee Tool and go to Edit –> Define Brush Preset. And that’s it, you’ve created a new fancy Brush!

– If you want to save your brush permanently go to Window –> Brush Presets –> click on the Brush Presets Icon (second from left along the bottom) and Select the Brushes you want save. Then save them in a named set.

If you want to download some groovy premade Brushes for your digital artwork, check out Brusheezy or TwoPeasinaBucket.

And if you want to see how Photoshop Brushes can be used to make all sorts of crazy and inspiring art then check out this CreativeLIVE course with the incredibly bubbly and charming Khara Plicanic, which was one of the most fun courses I attended at Photoshop Week.

I spent the last couple of days at CreativeLIVE again, doing a course on Photoshop Working Foundations with ace photographer and Photoshop guru Ben Willmore.  My only regret is that I wish I’d done this course before Photoshop Week as I would have got so much more out of all the other courses I sat through. 

I can’t recommend this course highly enough if you want to get the basics of Photoshop – selections, layers, masking, adjustments etc. down pat. One of the most useful courses I’ve ever done and it would be a great purchase if you are fairly new to Photoshop.

     
Share

The Best Traditional Easter Simnel Cake


Last year, in typical organised fashion, I managed to post a recipe for a traditional British Easter Simnel Cake a week after Easter. So this year I’m posting it up again, BEFORE the actual date, to give you a chance to actually make one for yourselves.  Don’t say I don’t love you.


So, Simnel Cake.

I know I should have posted this last week but I actually wanted to try the cake and see if this recipe was worth sharing with you.  And wow it really is.  Suffice it to say that four days after Easter this cake is already but a distant memory.  Do yourselves a favour and bookmark this recipe for next year.

simnel-cake (5 of 6)


First up a bit of history.  Apparently Simnel Cakes go back at least to medieval times when they were traditionally served on Laetare Sunday, a day in the middle of Lent when the Lenten fast was relaxed (sounds like cheating to me).  Since this day coincides with Mother’s Day in the UK, it was apparently the thing in Victorian times for daughters in service to bake a Simnel Cake to take home to their mothers.

Nowadays it’s thought of as an Easter cake, though it’s not very often made.  I think this is the third one I’ve made in my life.  Which is a shame, as it’s extremely delicious and not at all difficult.

Traditionally it’s a light fruit cake, stuffed full of vine fruits and spices, with a layer of marzipan baked into the cake and more toasted marzipan placed on the top.  There are always eleven marzipan balls placed on the top to represent the Apostles minus Judas Iscariot.  I also like to add a puddle of icing and some Cadbury’s Mini Eggs (they’re in the Bible somewhere, right?), but anything Easter-y such as chicks or flowers would do.  I think it’s safe to say that if you don’t like marzipan you will not like this cake.  If you do, though (and as far as I’m concerned marzipan should be a separate food group) then this tastes a little like a fruity, squidgy, non-bready stollen. 

If you live in the UK or anywhere where it is possible to get hold of good marzipan, then you need to buy around 450g/1lb of the stuff.  However, making your own marzipan is very quick and easy and it certainly tastes infinitely better than the peculiar canned almond paste I’ve found in the US.

I’m afraid I haven’t had time to convert to cup measures.  Time to get out those weighing scales!


simnel-cake (2 of 6)


This recipe is a combination of two or three recipes I found on the BBC website. Most traditional Simnel cake recipes are very similar though.

Ingredients

For the marzipan/almond paste

250g/9oz caster/baker’s sugar

250g/9oz ground almonds/almond meal

2 free-range eggs, beaten

1tsp almond essence or to taste

Mix the sugar and almonds in a large bowl and add the almond essence and enough beaten egg to turn the mass into a soft, sticky ‘dough’.  Knead everything together for one minute or so, until it becomes smooth and pliable. If it is too sticky add a little more sugar and almonds.  You want a workable mixture that is possible to roll out.  The marzipan will happily wait a day or two in the fridge.

For the cake

110g/4 oz raisins

110g/4oz sultanas/golden raisins

110g/4oz glacé/candied cherries (in the UK use those delicious undyed ones, I’ve yet to find a supplier of non-HFCS, undyed cherries in the US, if you come across such a delight please let me know)

110g/4oz currants/Zante currants

50g/2oz chopped candied peel (in the UK, you can buy pots of mixed peel, in the US I mix my own from orange, lemon and citron peel)

225g/8oz butter, softened

110g/4oz light muscovado sugar/soft brown sugar

110g/4oz caster/baker’s sugar

4 large eggs

225g/8oz self-raising flour (or 8oz all-purpose flour with 1 tsp baking powder)

1/2 teaspoon salt

2 lemons, grated zest only

2 tsp ground mixed spice (or 1 tsp ground cinnamon, 1/2 teaspoon ground allspice, 1/4 teaspoon ground nutmeg, 1/4 tsp ground cloves. You could also use pumpkin spice but it will taste a little different).


For the glace’ icing

225g/8oz icing sugar/powdered sugar

Enough water to mix to a pouring consistency.


simnel-cake (4 of 6)


Preparation method

  1. Cut the cherries into quarters, put in a sieve and rinse under running water. Drain well then dry thoroughly on kitchen paper. Do the same with your peel if it is sticky with HFCS.
  2. Weigh out all the fruit into a large bowl. Essentially you need around 500g/18oz of mixed dried fruit, so if you want to make some substitutions (pineapple, dried cherries or cranberries might be nice) or play around with the proportions then be my guest.  This mix is the traditional one for a Simnel cake though. If you’re feeling fancy then you can soak the fruit overnight in some amontillado sherry, but I didn’t with this cake.
  3. Preheat the oven to 150C/280F/Gas 2. Grease and line a 20cm/ 8in Springform cake tin.
  4. Cream the butter and sugars together in the stand mixer until very pale and soft.
  5. Beat in the eggs one at a time with a tablespoon or two of flour between each egg addition to stabilise the mixture and prevent curdling.  If it curdles a little it’s not a big deal.
  6. Stir in the rest of the flour and salt, the lemon zest and the spices. Mix until fully combined.
  7. Stir in the dried fruit with a wooden spoon until it’s fully distributed through the mixture.  The mixture should be of a soft ‘dropping’ consistency.  If it is too dry then stir in a tablespoon or so of milk.
  8. Spoon half the cake mix into the prepared cake tin
  9. Take one-third of the marzipan and roll it out to a circle the size of the tin and then place on top of the cake mixture.
  10. Spoon the remaining cake mixture over top and level the surface. I like to create a slight indentation in the centre so the cake doesn’t get too domed.
  11. Bake in the pre-heated oven for about 2 1/4 hours, or until well risen, evenly brown and firm to the touch.  A skewer or stick of spaghetti stuck into the centre of the cake should come out clean.
  12. Cover with aluminium foil after one hour if the top is browning too quickly. Leave to cool in the tin for 10 minutes then turn out, peel off the parchment and finish cooling on a wire rack.
  13. When the cake is cooled, turn it upside down.  If you want brush the top with a little warmed apricot jam and roll out half the remaining marzipan to fit the top. Press firmly on the top and crimp the edges to decorate. (My marzipan was sticky enough not to require jam).
  14. Make a stubby snake with the remaining marzipan third and cut it into 11 equal pieces. Form the marzipan into 11 balls.
  15. Brush the marzipan with beaten egg and arrange the marzipan balls around the edge of the cake. Brush the tops of the balls with beaten egg and then carefully place the cake under a hot grill/broiler until the top is lightly toasted or, as I did, use a chef’s blowtorch.  If you’re using the grill be careful not to set fire to the cake.
  16. Mix up the icing sugar and water to a pouring consistency and pour a puddle onto the surface of the cake.  When set, decorate with Easter-y things.


This is what your cake should look like inside. The layer of baked almond paste makes it all juicy, succulent and not at all dry, unlike many fruitcakes of my acquaintance.

Happy belated Easter!


simnel-cake (6 of 6)


Share

Eggstra Special Easter Ideas


Yay! It’s that time of year again when I get to make terrible, tired puns and pin up pictures of crafts and foods I have little chance of actually making (particularly with my current less than adequate kitchen arrangements).

Actually these decorated eggs(not edible) look eminently doable with the right sprinkles {via Studio DIY}.


sprinkleeggs

Loving these beautiful painterly paints from the lovely Leslie Shewring {via Decor8}.


eastereggleslieshewring


We have managed to indoctrinate the Minx into the true British ways of the Cadbury’s Crème Egg, which I import from the UK via the British Food Shop.

These crazy cupcakes have a whole crème egg baked inside of them {via Key Ingredient}.


cremeeggcupcake


These cupcakes are slightly less insane {via Recipe by Photo}.

Chickcupcakes


And here are instructions to make crochet covers for blown eggs. Wish I’d seen these sooner they would be great to make for the Easter tree. {via LVLY}


crocheteasteregg


Here’s last year’s round up of Easter-related puns crafts.

Time to eggs-it stage left, methinks.

   
Share

How To Temper Chocolate


So today, chaps, we’re going to do some science (cue sound of frantic scurrying in opposite direction).


chocolatedippedstrawberries-8


Fortunately this science involves the melting and eating of chocolate, which makes me wonder why they didn’t teach this sort of science at school (though I was always quite partial to Chemistry, which is really just cooking for people who don’t like to eat).

But I digress.

Last month I was looking for a quick, easy and luxurious Valentines’ treat that I could make for my beloved family, which didn’t actually involve much, you know, actual work.

So I hit upon the idea of chocolate dipped strawberries. Obviously this was not a particularly original Valentines’ idea, so much so that even my local rather crappy supermarket was equipped with the right sort of hideously expensive, resolutely hothoused, absolutely gigantic, long-stemmed strawberries that you need (and that I never, ever saw in the UK).


chocolatedippedstrawberries-2


The only tricky thing about dipping strawberries in chocolate is that the chocolate needs to be tempered, so that the chocolate you end up with after melting and cooling remains glossy and has that perfect chocolate ‘snap’ to it, instead of being dull, mealy and soft.

This is because cocoa butter has a crystalline structure.  In properly tempered chocolate (like the stuff you buy) all the crystals are lined up neatly and in the same direction, which gives the chocolate its texture and sheen.  When you melt chocolate the crystals get all higgledy piggledy – the chocolate tastes the same, but the snappy texture and glossy sheen will have disappeared – UNLESS you bring it back into temper again.

There you go, the science is over.  You can take you fingers out of your ears and stop singing lalalalalala now.


chocolatedippedstrawberries-7 chocolatedippedstrawberries-5


Tempering chocolate is one of those things that sounds scary but really isn’t.  I’d never done it before making these and ended up with a pretty good result.  The one thing I’d say though is that if you’re a beginner, you’ll need a good food thermometer.  The temperatures have to be precise, and while it’s apparently possible to discern changes in the texture and look of the melted chocolate when it hits the right temperatures if you’re experienced, I really couldn’t see much difference.


chocolatedippedstrawberries-3


Method

And now that I’ve put the fear of God into you, here’s what you do.

First break your chocolate into chunks or, as I did, use Guittard chocolate wafers.  Chocolate chips made for cookies are not suitable for tempering.

Using a double boiler, or a glass Pyrex bowl over a pan of simmering water, bring your chocolate to a melting temperature ie. 115 degrees F (46 degrees C) for dark chocolate and 110 degrees for milk or white. Be super careful not to heat it too high otherwise it will seize.  Also WATER + CHOCOLATE = TROUBLE.  Don’t say I didn’t warn you.

At this point if you have a cold marble slab in your kitchen you can pour the chocolate out and start throwing it around so that it cools to the correct temperature. You’re on your own with that though.  I’ve never done it before.


chocolatedippedstrawberries-6 chocolatedippedstrawberries-9


If you’re not using a marble slab, grab a handful of unmelted chocolate wafers or chunks of chocolate and add them to the chocolate and stir as if your life depended on it. This is called ‘seeding’ and the fact that the crystals in this tempered chocolate are properly arranged will help the crystals in the melted chocolate to arrange themselves accordingly.  Keep adding a few chocolate wafers and stirring the chocolate until the temperature drops to the recommended temper point – 88- 90 degrees F (31-32 degrees C) for dark chocolate and 80-82 degrees F (27-28 degrees C) for milk or white.  This will take about 15 minutes and is hard work.

If the chocolate gets too cool and too stiff to work at this point you can reheat it a little with a hairdryer, but be careful not to take it warmer than 92 degrees or else it will be out of temper again.

Once you’ve got your melted tempered chocolate, things get much easier.  Dip the strawberries in the chocolate and lay them on a sheet of baking parchment or Silpat (I learned to my cost that the baking rack isn’t a good idea as things stick).

If you want to make artsy white chocolate dribbles, snip the corner off a small Ziploc bag, fill it with melted tempered white chocolate and wave the bag about over your chocolate covered strawberries.

And that’s it.  Easy peasy lemon squeezy.


chocolatedippedstrawberries-12


Share